Deploy a file-sharing service on Azure

The goal is to create and deploy a website that lets users upload files, optionally encrypt it with a password, and provides them with a download link to that file. Check out the source code if you want to see what it looks like in the end.
Setup a Storage Account and authorize access from the application
We will store the files as blobs in a storage account. Go ahead and create a storage account and add a container where you'd like to store the uploaded files. My container is called userfiles.
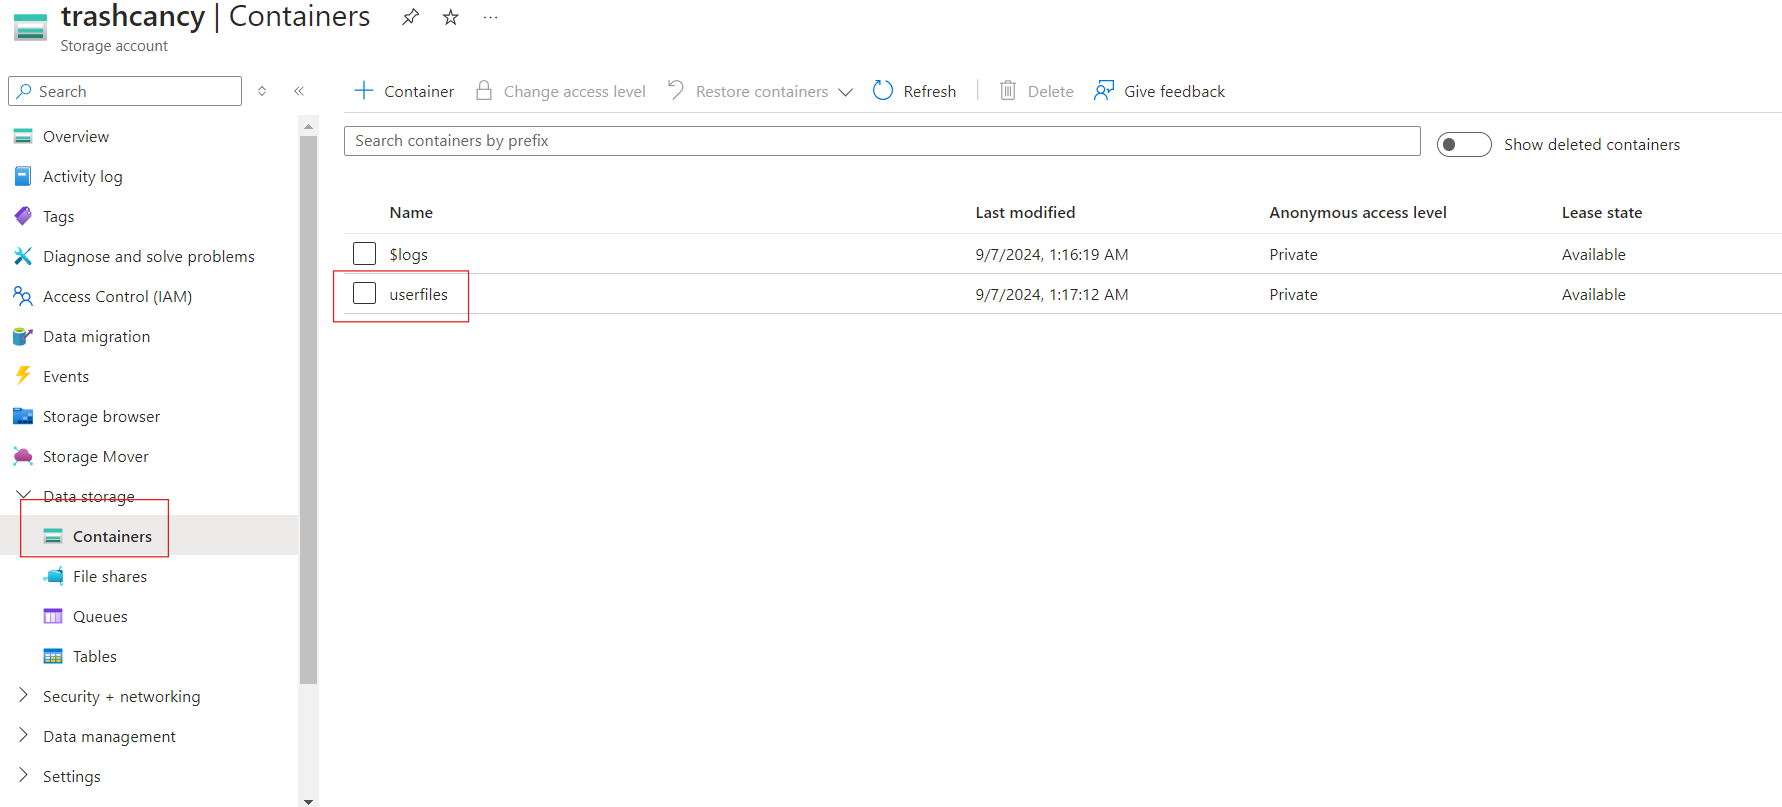
Now that our storage account is setup, we are going to write some code to talk to it and store files into it. Create a Python file and import the following:
from azure.identity import DefaultAzureCredential
from azure.storage.blob import BlobServiceClient
If you don't have these modules run pip install azure-storage-blob azure-identity in a terminal to install them. You can authorize your application to Azure Blob Storage by using the account access key, but that's not recommended because if you ever expose that key inadvertently, someone who gets their hands on them will have full access to your storage account. DefaultAzureCredential supports all kinds of authentication methods and automatically decides which one to use at runtime so you don't have to make any code changes when switching environments. For example, your app can use your Azure CLI credentials to authenticate itself when running locally and use a managed identity when it's deployed to Azure. This is exactly how we will doing things. Since we will be running things locally first, make sure that you are logged into Azure CLI with the az login command.
The account you use to login to Azure CLI must have correct permissions to read and write blob data. Specifically, the Microsoft.Storage/storageAccounts/blobServices/containers/blobs DataActions. You may want to assign yourself the Storage Blob Data Contributor role which has all the necessary permissions.
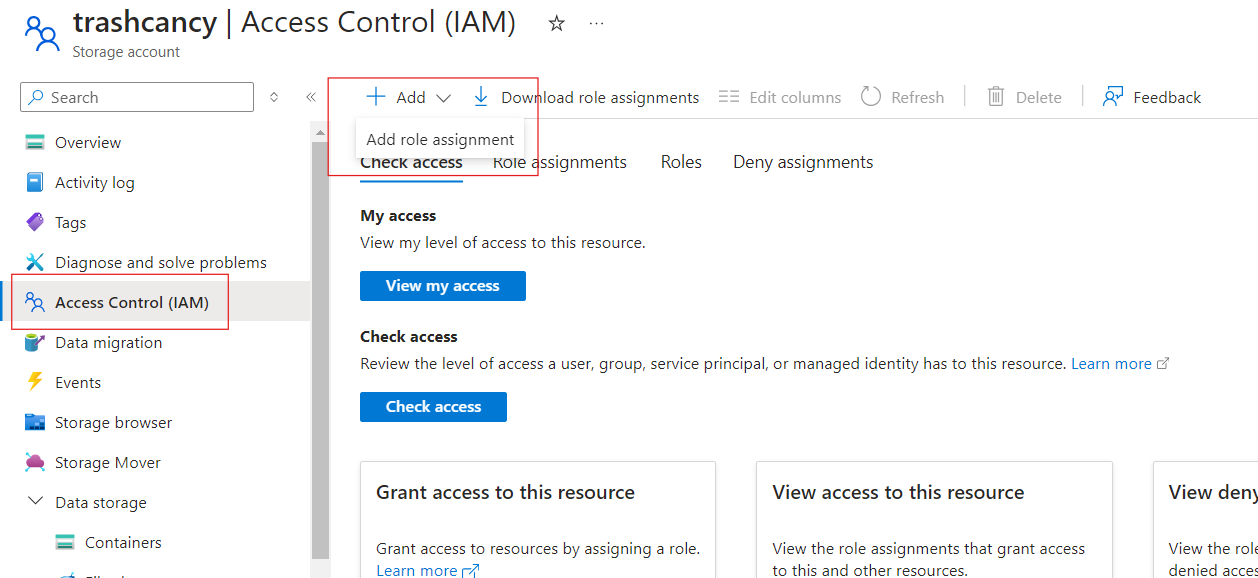

It's very simple to connect to your storage account with DefaultAzureCredential:
CONTAINER_NAME = 'userfiles'

account_url = "https://<your_storage_account>.blob.core.windows.net"
default_credential = DefaultAzureCredential()

blob_service_client = BlobServiceClient(account_url, credential=default_credential)
Go ahead and run that. If it runs without any error, it's working.
Create a website that lets user upload a file
Now, we will write code for the web app. If you don't have Flask installed, run pip install Flask. You probably don't want to allow users to upload every type of file. We will create a function to check if we allow the file the user is trying to upload.
ALLOWED_EXTENSIONS = {'txt', 'pdf', 'png', 'jpg', 'jpeg', 'gif', 'docx'}
def allowed_file(filename):
    return '.' in filename and filename.rsplit('.', 1)[1].lower() in ALLOWED_EXTENSIONS
For the website itself:
from flask import Flask, flash, request, redirect, Response
from werkzeug.utils import secure_filename

app = Flask(__name__)
@app.route('/', methods=['GET', 'POST'])
def upload_file():
    # a POST request means the browser is sending a file
    if request.method == 'POST':
        if 'file' not in request.files:
            flash("No file part")
            return redirect(request.url)
        file = request.files['file']

        # the browser sends an empty filename
        # if the user did not select a file

        if file.filename == '':
            flash('No selected file')
            return redirect(request.url)
        # check if the file is allowed
        if file and allowed_file(file.filename):
            filename = secure_filename(file.filename)
            blob_client = blob_service_client.get_blob_client(container=CONTAINER_NAME, blob=filename)
            blob_client.upload_blob(file)

    # this is the HTML page that's sent in response to a GET request includes a form that lets the user upload a file
    return '''
    <!doctype html>
    <title>Upload new File</title>
    <h1>Upload new File</h1>
    <form method=post enctype=multipart/form-data>
      <input type=file name=file>
      <input type=submit value=Upload>
    </form>
    '''
We use secure_filename to protect against malicious filenames which are often used by attackers to exploit web applications. You really just need these two lines of code to upload the file to Azure Blob Storage:
blob_client = blob_service_client.get_blob_client(
                container=CONTAINER_NAME,
                blob=filename)
blob_client.upload_blob(file)
This uploads the file to CONTAINER_NAME container as a blob with name filename.
Run the application locally in a development server with flask run -app <filename.py>. Flask will output the URL of your local server.
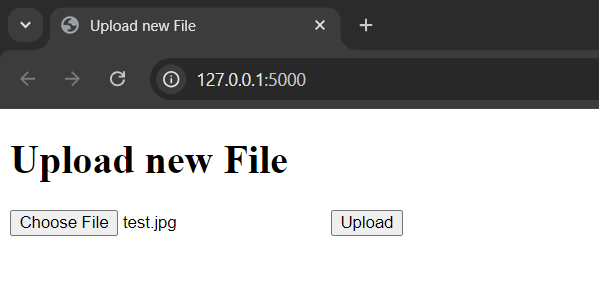
You should be able to browse to your container on Azure Portal and see the file you just uploaded in there.

Let the user download a file
You can create a SAS link that lets the user download the file straight from Azure Blob Storage. But, we are not doing that. One of our features is encryption. Our app would need to fetch data from Azure and decrypt it before sending it to the browser. I have Storage Key Access for my Storage Account disabled and use Entra-authentication anyway. With these lines of code you can get the requested file from Azure and send it to the browser:
@app.route('/file/<name>')
def download_file(name):
    def generate_file():
        blob_client = blob_service_client.get_blob_client(
                        container=CONTAINER_NAME,
                        blob=name)
        stream = blob_client.download_blob()
        for chunk in stream.chunks():
            yield chunk
    return Response(generate_file(), mimetype=mimetypes.guess_type(name)[0])
The user can visit /file/<filename> to download an uploaded file. generate_file() is a generator function that fetches the file data from Azure Blob Storage chunk by chunk. If it's a large file, you don't want to download all of it into the memory at once. Flask supports generator function as a response which means you can just pass this function to Response() and it will take care of the rest. Now your app gets a chunk from Azure Blob Storage sends it to the browser, gets the next chunk and repeats until the whole file is transferred. Hopefully, you won't run out of memory transmitting large files now. Also, make sure the mimetype is correct so the browser knows what you're sending. Use mimetypes.guess_type() to guess the type based on the file extension. This function returns a (type, encoding) tuple where type is a string like type/subtype, suitable for the Content-Type header.
Try to download the file you just uploaded.

Perfect! The browser knows that it's a image file because of the correctly labeled Content-Type and displays it. You can also set the Content-Disposition header to attachment to instruct the browser to download the file to disk instead of displaying it. To do this add a headers argument to the returned Response:
return Response(generate_file(),
                mimetype=mimetypes.guess_type(name)[0],
                headers={'Content-disposition': 'attachment'})
I'm not going to do that though. I will let the user decide what goes into their disk.
Create a Docker container
Our application will be deployed to Azure as a Docker container. You need to create a Dockerfile which is basically a set of instructions for building your Docker image.
FROM python:3.12

EXPOSE 80 2222
WORKDIR /usr/src/app

COPY . .

RUN curl -fsSL https://packages.microsoft.com/keys/microsoft.asc | gpg --dearmor -o /usr/share/keyrings/microsoft-prod.gpg \
    && curl https://packages.microsoft.com/config/debian/12/prod.list > /etc/apt/sources.list.d/mssql-release.list \
    && apt-get update \
    && ACCEPT_EULA=Y apt-get install -y --no-install-recommends \
    unixodbc msodbcsql18 dialog openssh-server \
    && echo "root:Docker!" | chpasswd \
    && chmod +x ./entrypoint.sh
COPY sshd_config /etc/ssh/

RUN pip install --no-cache-dir -r requirements.txt

ENTRYPOINT ["./entrypoint.sh"]
We expose port 80 for the website and port 2222 for the App Service Web SSH feature which can be very useful for debugging. The password for root has to be Docker! for it to work, but the port 2222 is never exposed to the internet so it's all safe. You also need unixodbc and msodbcsql18 drivers to connect to Azure SQL Server which we will be doing soon. Your sshd_config file should look like this:
Port    2222
ListenAddress   0.0.0.0
LoginGraceTime  180
X11Forwarding   yes
Ciphers aes128-cbc,3des-cbc,aes256-cbc,aes128-ctr,aes192-ctr,aes256-ctr
MACs hmac-sha1,hmac-sha1-96
StrictModes     yes
SyslogFacility  DAEMON
PasswordAuthentication  yes
PermitEmptyPasswords    no
PermitRootLogin         yes
Subsystem sftp internal-sftp
You can read more about setting up SSH on custom Linux containers here.
Our entrypoint.sh file looks like this:
#!/bin/sh
set -e
service ssh start
exec gunicorn main:app > gunicorn.log 2> gunicorn_error.log
It just starts the ssh service and our gunicorn server. For gunicorn, I want stdout to be redirected to gunicorn.log and gunicorn_error.log for stderr. These logs will be useful to debug when things don't work. I can login with SSH to access them.
Create an Azure Container Registry and setup CI/CD with Github Actions
We will use Azure Container Registry to store our container image. Create an ACR with default settings and Basic SKU should be fine.
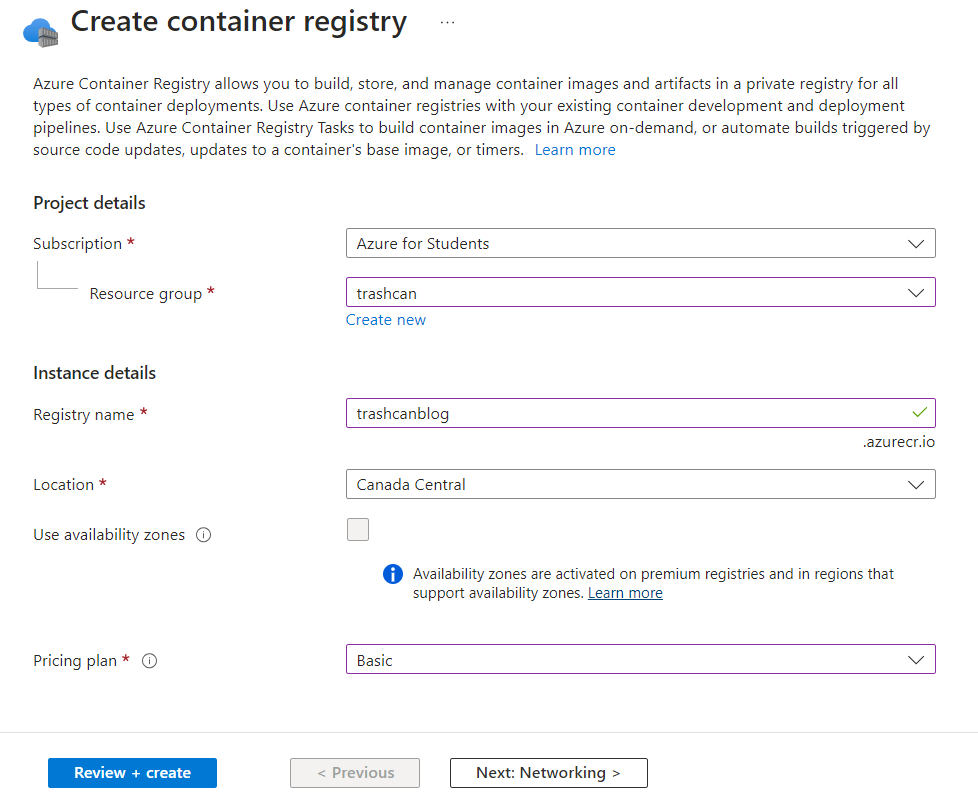
Create a managed identity which will be used by Github to push images to the registry. Add a new credential under the Federated credentials blade of the managed identity.
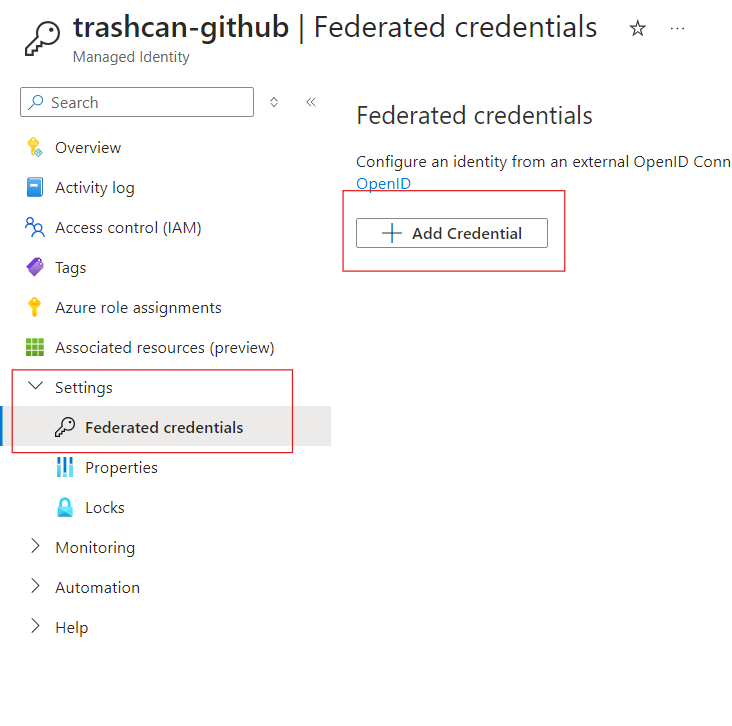
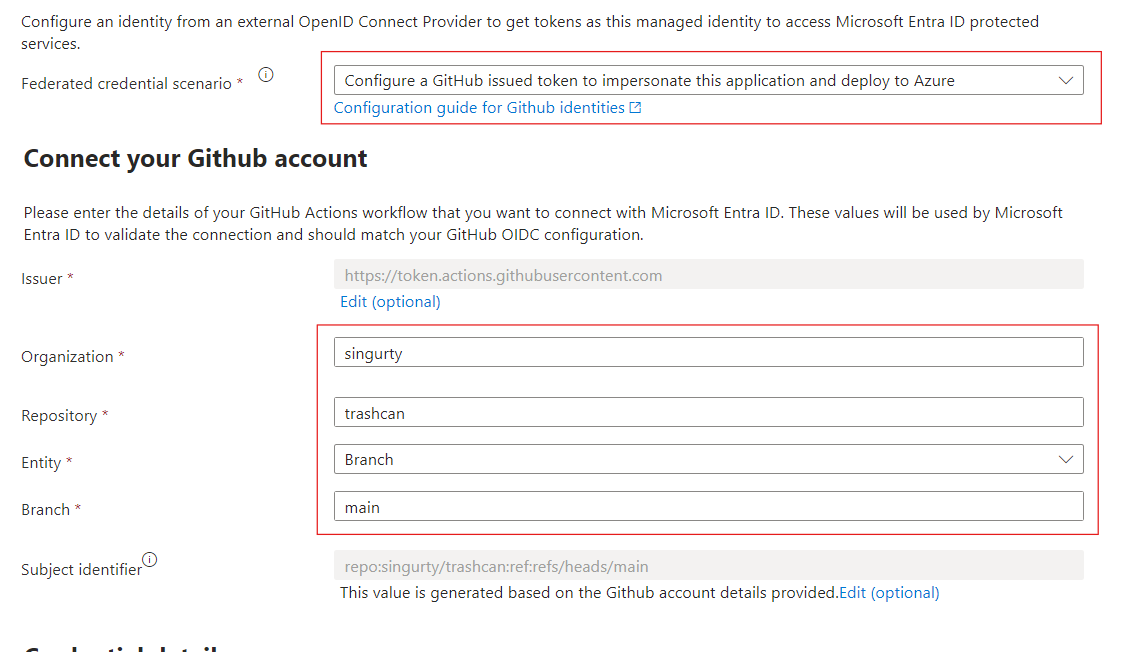
Select Github Actions deploying Azure resources scenario and enter your Github repository details. This will be repository where your code and Actions workflow will be in.
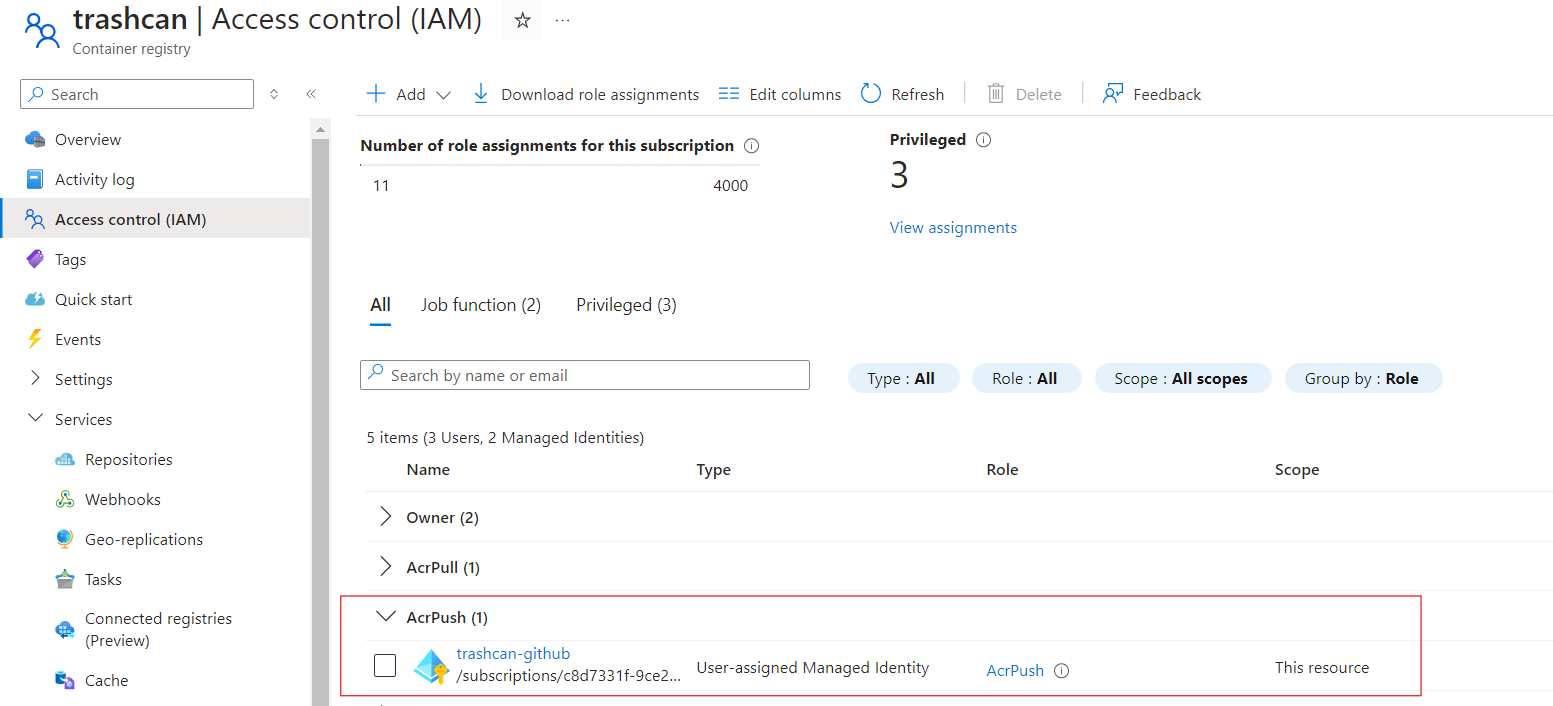
Assign the Github managed identity AcrPush role on the registry. This will allow our Actions workflow to push docker images into the registry.
For Github Actions to use this managed identity, you need to create some secrets in your repository. Navigate to the settings page of your repository and under Secrects and Variables and Actions, create these secrets:

You will find these values in the Overview blade of the managed identity you created for Github.
Create a YAML file under .github/workflows directory in your project. This will house the Actions configuration to build our docker container and push it to ACR. Mine looks like this:
name: Docker Image CI

on:
  push:
    branches: [ "main" ]
  pull_request:
    branches: [ "main" ]

permissions:
  id-token: write
  contents: read

jobs:

  build-and-push:
    runs-on: ubuntu-latest

    steps:
    - name: Azure login
      uses: azure/login@v2
      with:
        client-id: ${{ secrets.AZURE_CLIENT_ID }}
        tenant-id: ${{ secrets.AZURE_TENANT_ID }}
        subscription-id: ${{ secrets.AZURE_SUBSCRIPTION_ID }}

    - uses: actions/checkout@v4
    - name: Build and push the Docker image
      run: |
        az acr login --name trashcan
        docker build . -t trashcan.azurecr.io/trashcan:${{ github.sha }} -t trashcan.azurecr.io/trashcan:latest
        docker push trashcan.azurecr.io/trashcan --all-tags
Replace trashcan.azurecr.io with your registry's URL. This workflow will build the image, tag it with both the commit ID and latest, and push it to the registry using the credentials supplied in secrets.
Deploy to Azure
Now, for the fun part. Let's put our app on the internet with Azure! Create create a Linux-based App Service Plan. The Free tier should be fine until you start getting some real traffic, but you will need at least a Basic plan to setup virtual network integration which we will need to do to let our app connect to the Storage Account and SQL Server later.
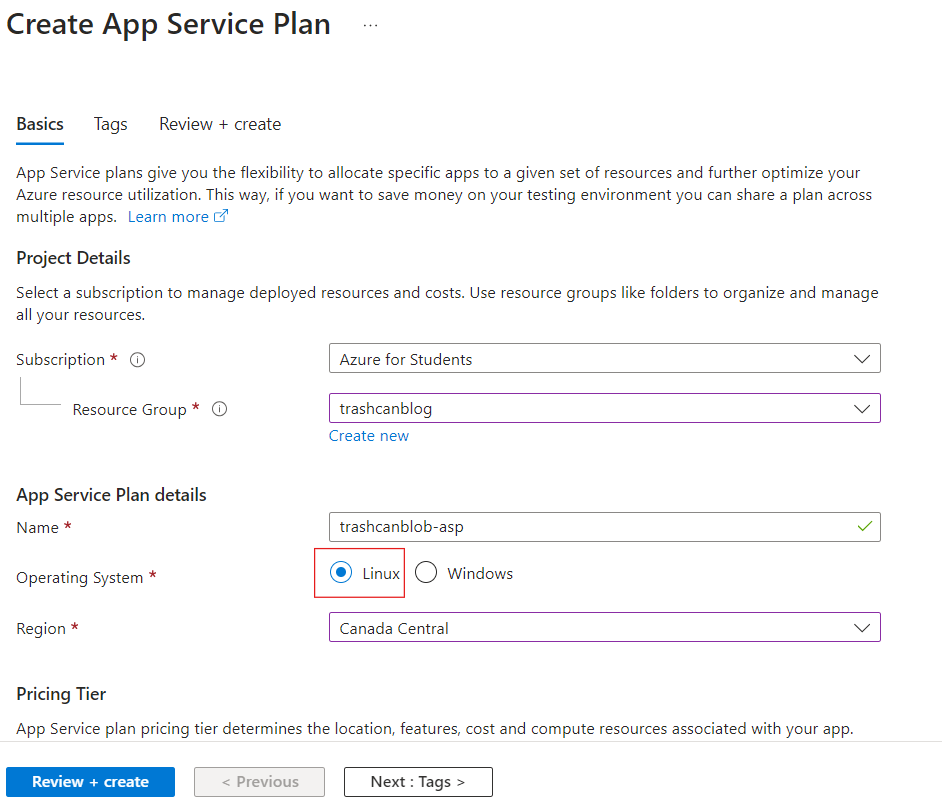
Next, create an App Service in the App Service Plan you just created. Choose the Container publishing model. Make sure that you are in the same region as your ASP or else you won't see it.
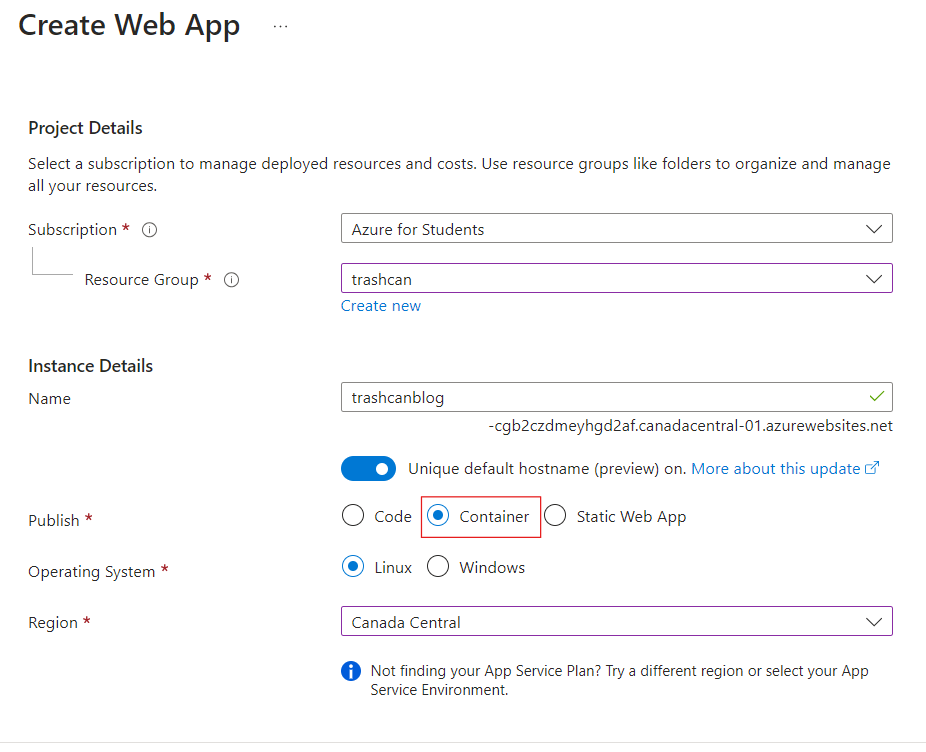
Enable the system-assigned managed identity for the app. You can also use a user-assigned managed identity if you'd like.

Grant that identity AcrPull role on the container registry. This will allow the app service to pull docker images from the registry and deploy.
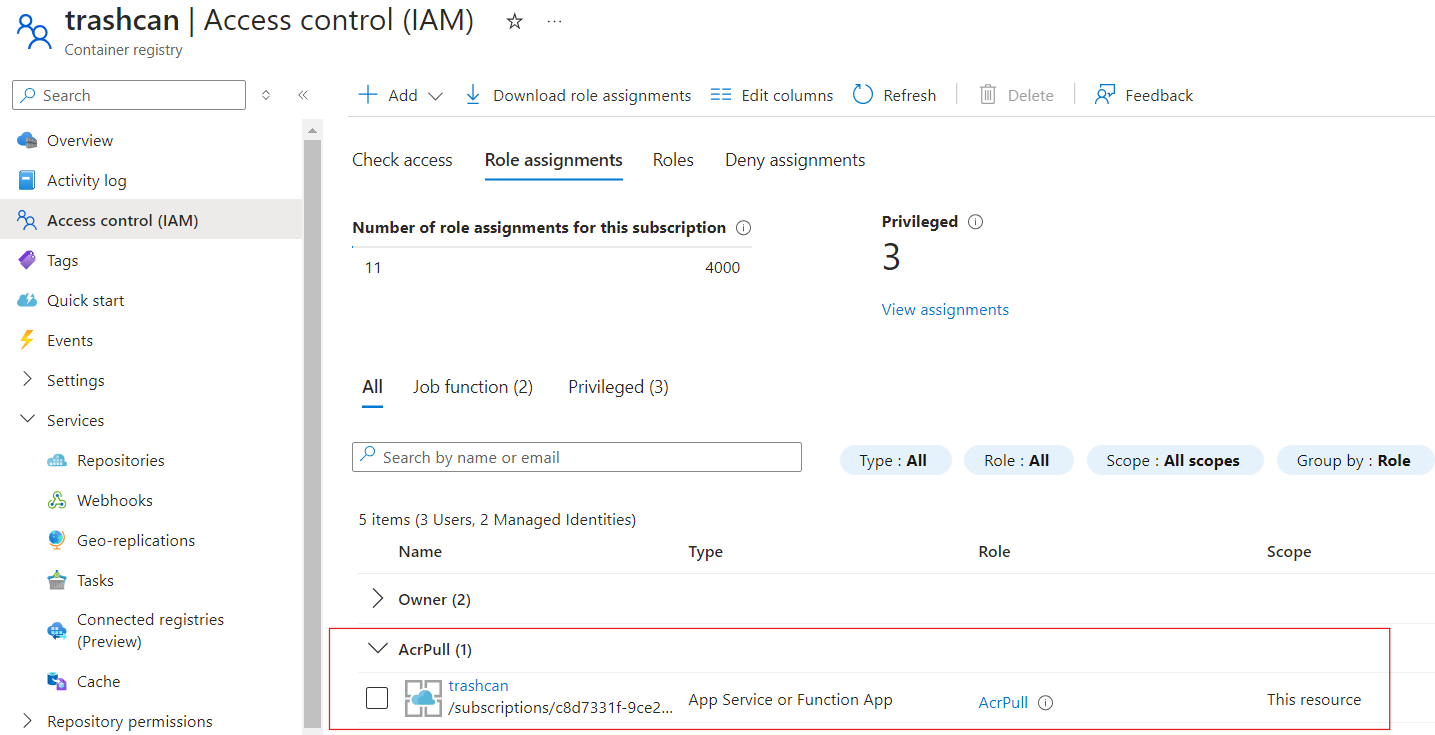
Before we push the code got GitHub, we need to do a couple things to make our code production-ready-ish. We will use gunicorn to run our Flask server on prod. From their website:
Gunicorn ‘Green Unicorn’ is a Python WSGI HTTP Server for UNIX. It’s a pre-fork worker model ported from Ruby’s Unicorn project. The Gunicorn server is broadly compatible with various web frameworks, simply implemented, light on server resources, and fairly speedy.
Install it with pip install gunicorn. Next, we need to create a requirements.txt file that contains a list of our application's dependencies. To create the file run pip freeze > requirements.txt. Push these changes to Github. The Dockerfile we created has a command to install modules from this file into the image. Github Actions will use this file to build the Docker image and push it to ACR. ACR will call the webhook to let the App Service know that a new image is available. App Service will use fetch the new image and deploy. Don't forget to keep this file up-to-date or else the container might fail to run after deployment. It's a good idea to use a staging deployment slot to test before prod with the added benefit of zero-downtime slot swaps. But you need to scale up to at least a Premium P0 tier to use this feature. If you have a system dependency, update Dockerfile to add instructions for docker to install them to your container.
Navigate to the Deployment Center blade of your App Service. Select Container Registry as your source and select the registry you created before. Use the same managed identity where you assigned the AcrPull role.

Enable Continuous deployment. It will create a webhook that the container registry will call whenever there's a new image pushed into it. Our app service will then fetch the new image and redeploy our application with the new changes.
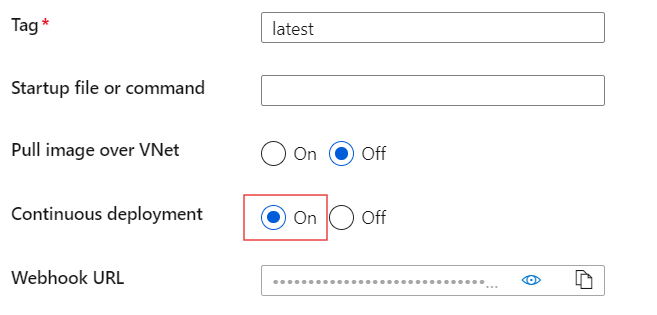
Container registry will use SCM Basic Auth to authenticate with the app service when calling the webhook. Make sure that you have this authentication method enabled in your app service's configuration.

Without this, the webhook calls may fail with a 401. You can see all the webhook calls made by the registry under the Webhooks blade in the portal.
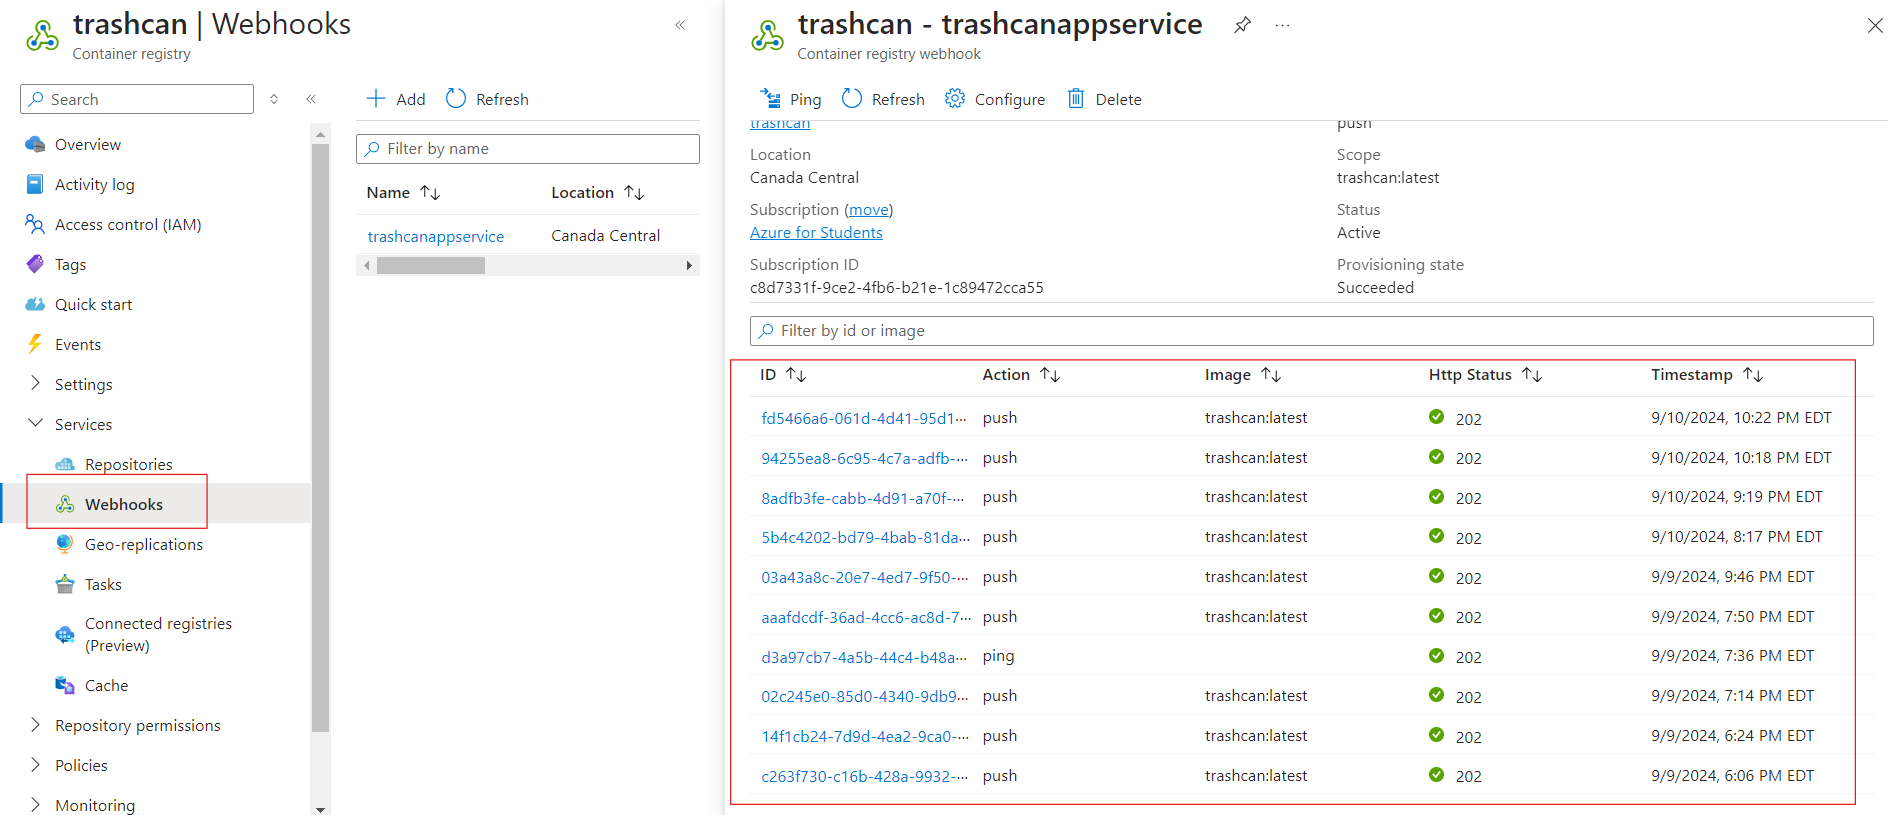
Assign the Storage Blob Data Contributor role on storage account to the manged identity of the app.
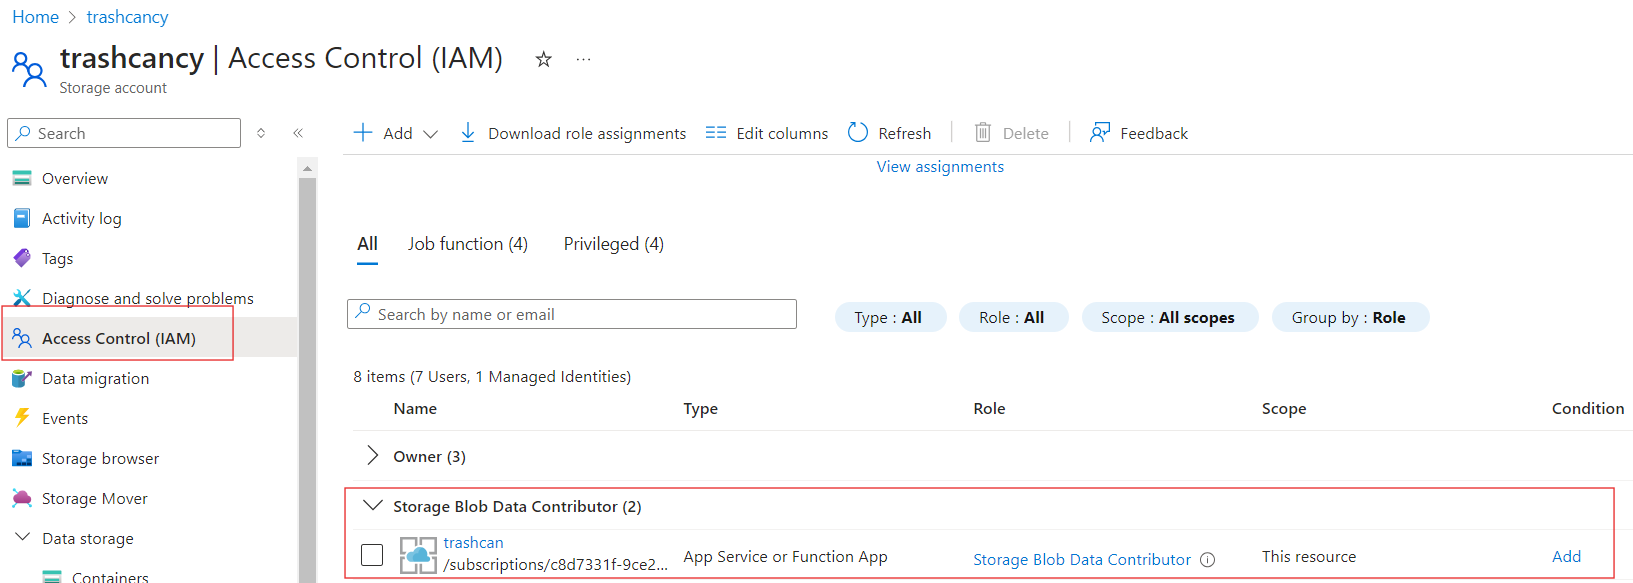
You can use the default domain that's created with App Service to access your application over the internet.

Everything's working like we expected. We did not have to change any code when switching environments.

Setup a custom domain
You don't want to keep using that gibberish default domain right? Navigate to the Custom domains blade of your App Service and setup the following settings:
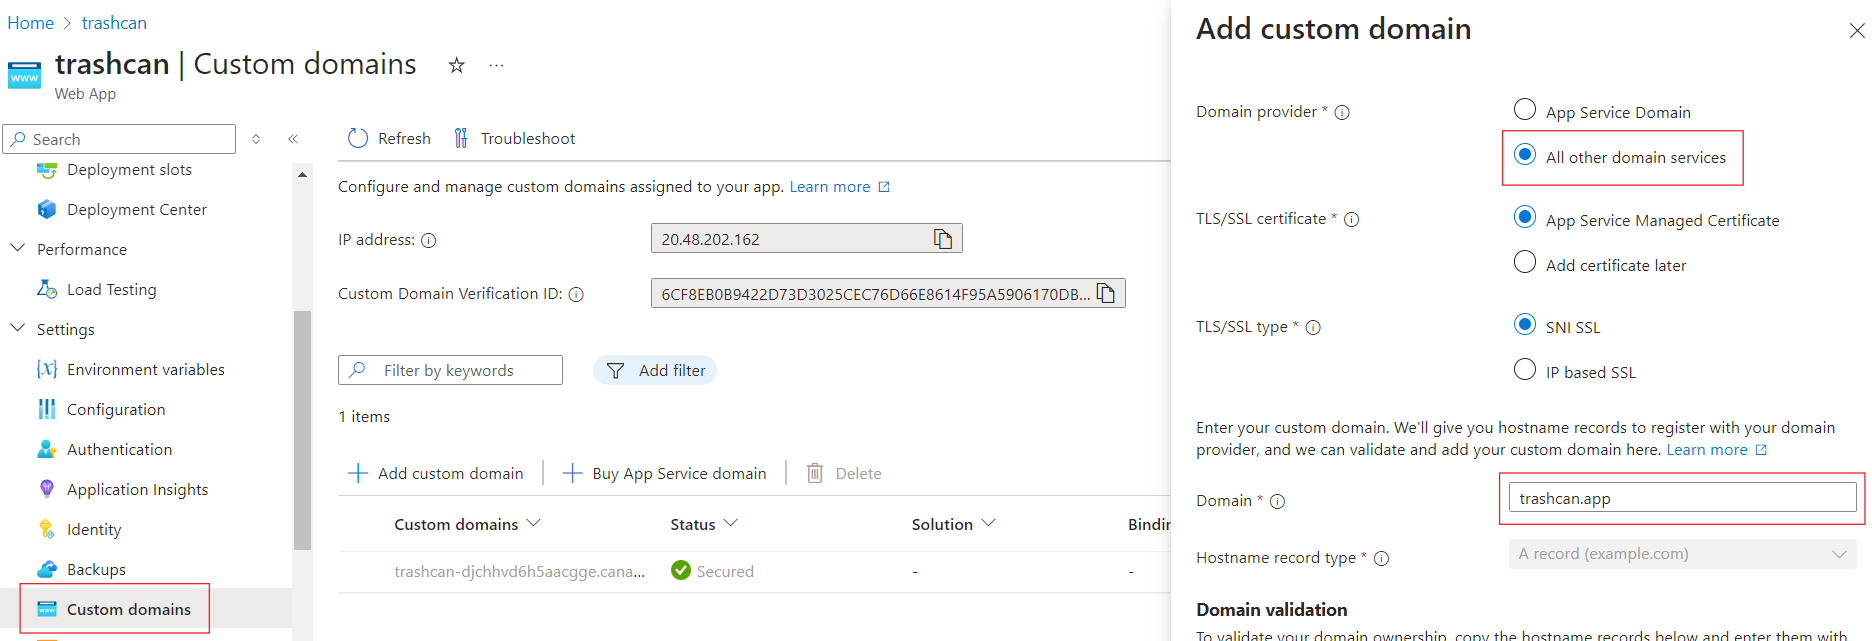
You will want to select All other domain services if you did not buy your domain from Azure. Enter your domain and you will be presented with an A and a TXT record that you need to add to your domain's zone, usually in the registrar's website.
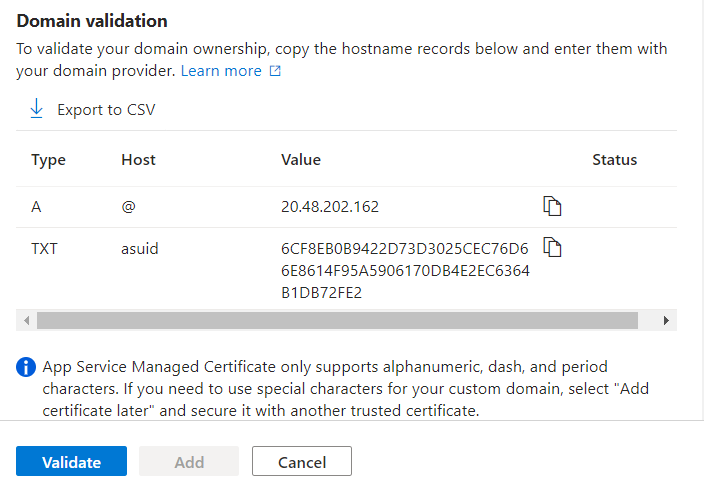
Validate and add it. App Service automatically sets up certificates required for HTTPS, but it may take a while.
Disable public network access on the Storage Account
Since your app is on Azure, you don't need to have public access enabled on your Storage Account, but we need to setup some networking stuff to let our app access. Create a virtual network and a subnet for the app.
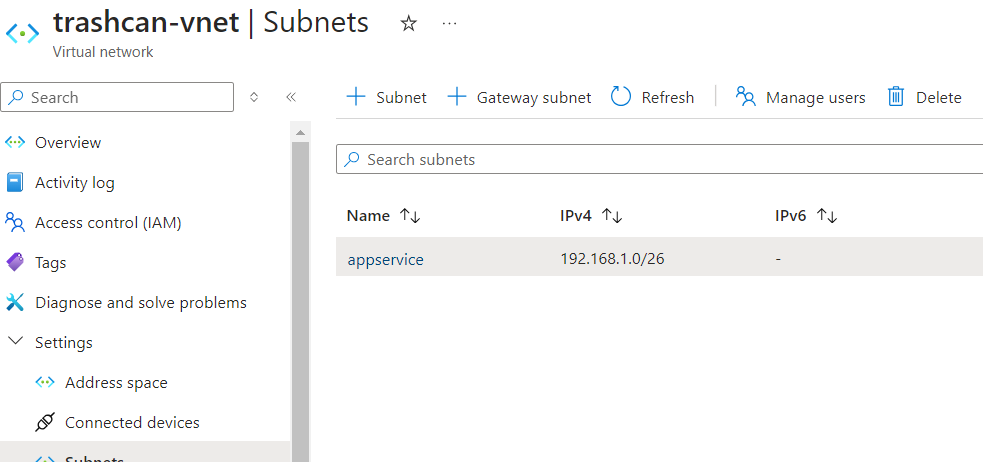
Microsoft recommends that you allocate atleast a /26 size subnet to account for future upscaling. Navigate to the Networking blade of app service to setup virtual network integration.

Select the virtual network and subnet.
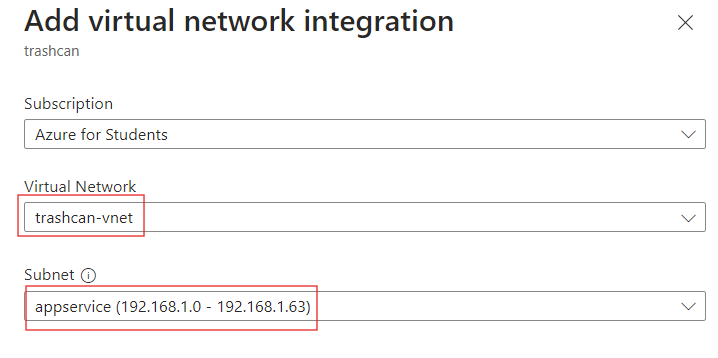
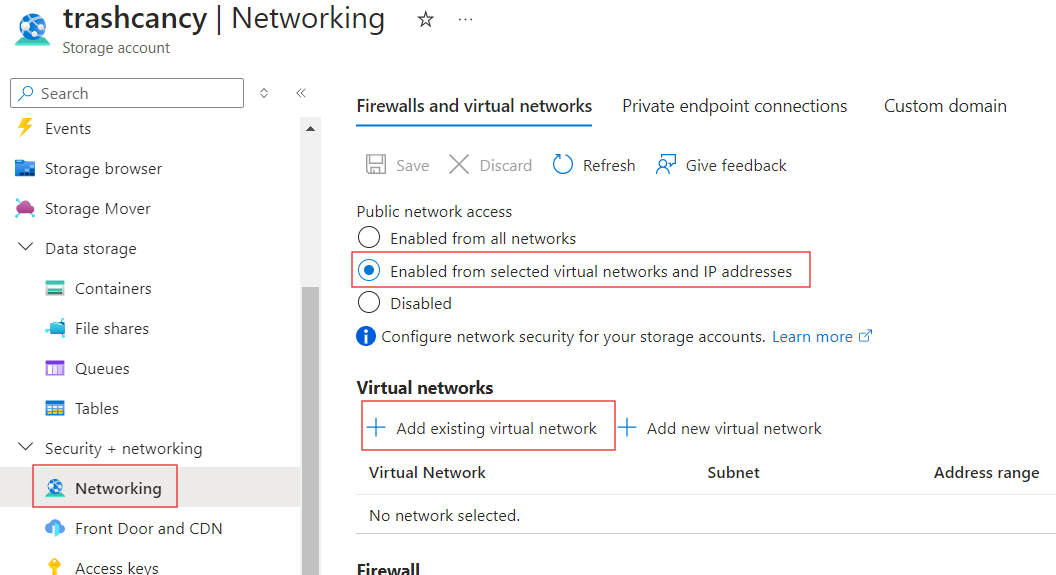
Now your app service can send outbound traffic to the vnet. Navigate to the Networking blade of your storage account. Select the option to only allow access from selected virtual networks and add our app service vnet and subnet.

Create a database
We will need a database to store password hash, nonce, and salt to have encryption and a unique URI for each file because if we identify files by name, what happens if there are two files with the same name? The URI will be randomly generated to also prevent people from guessing a file's id. Azure SQL Server has a generous free tier and it is very simple to set up (once you know how it works of course).
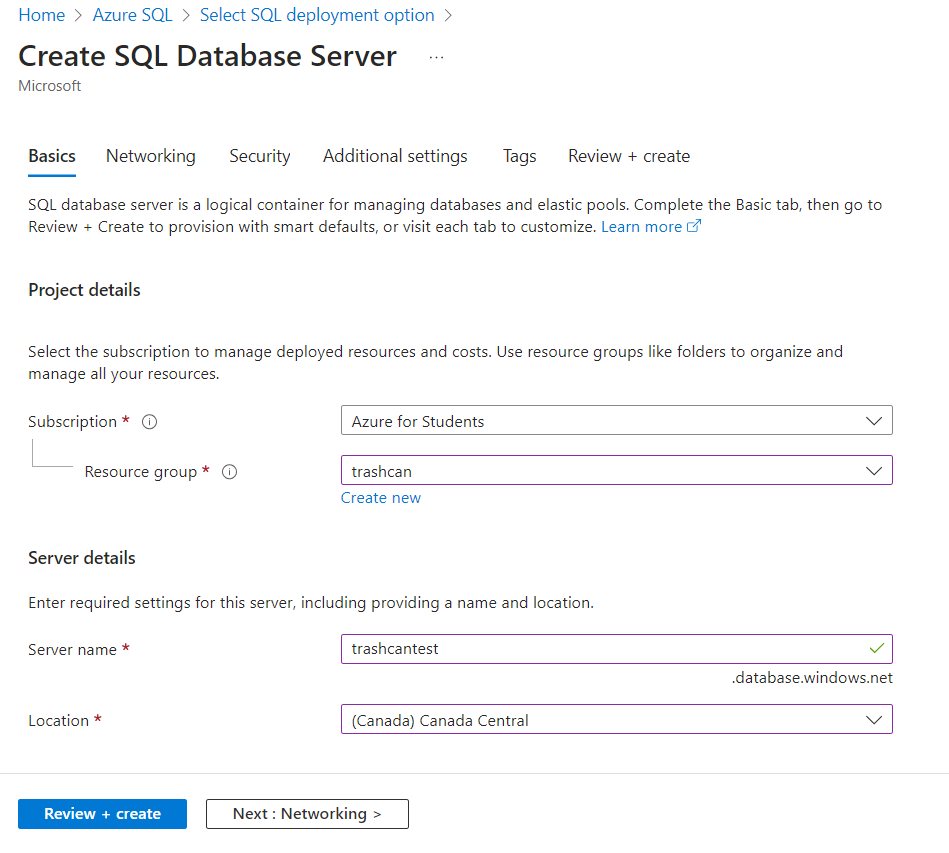
We will use Entra-only authentication. Set yourself as the admin.
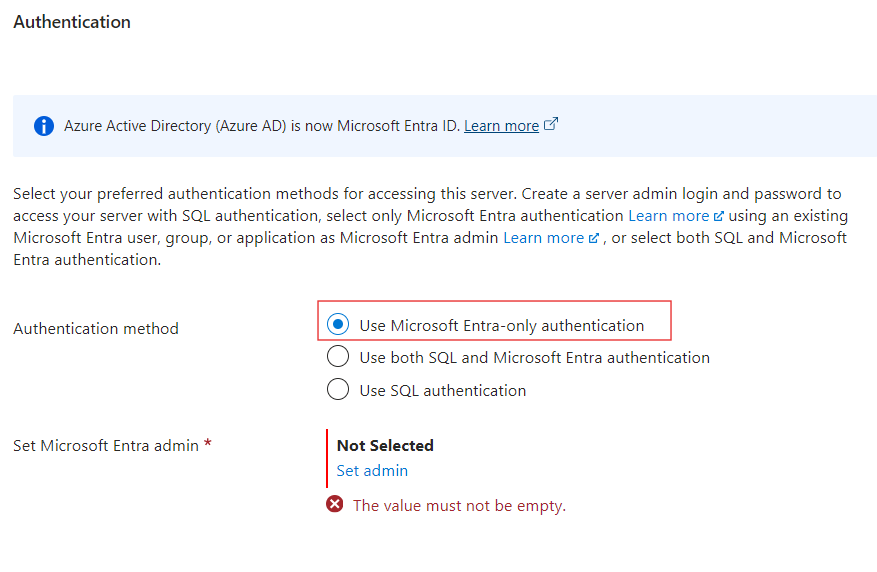
Then create a database in the server.
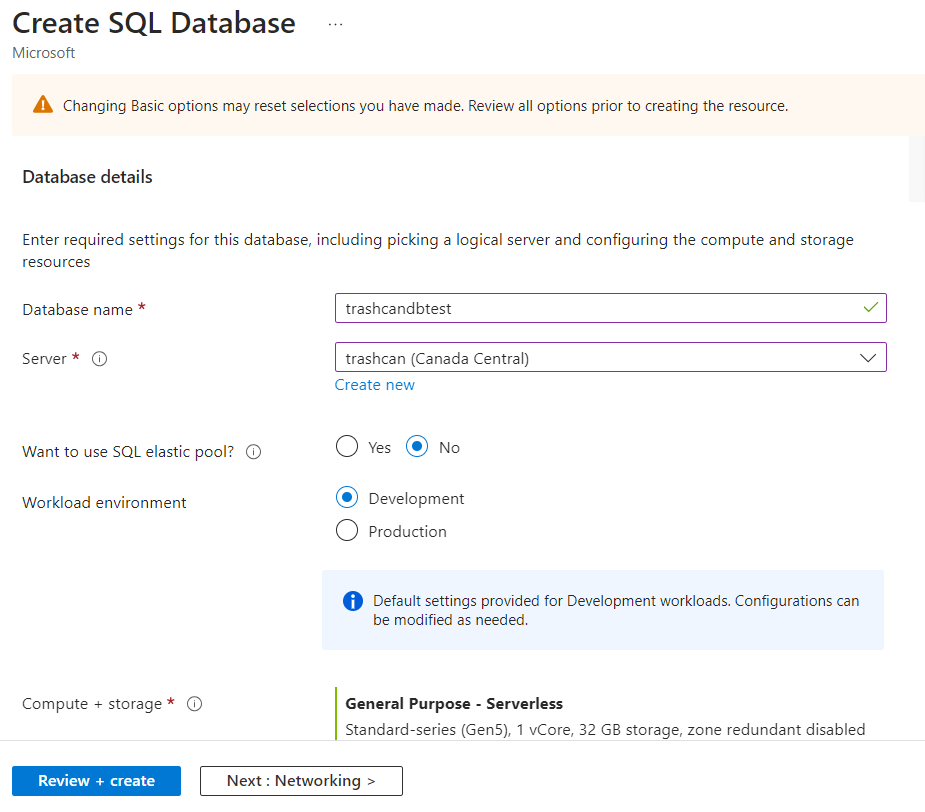
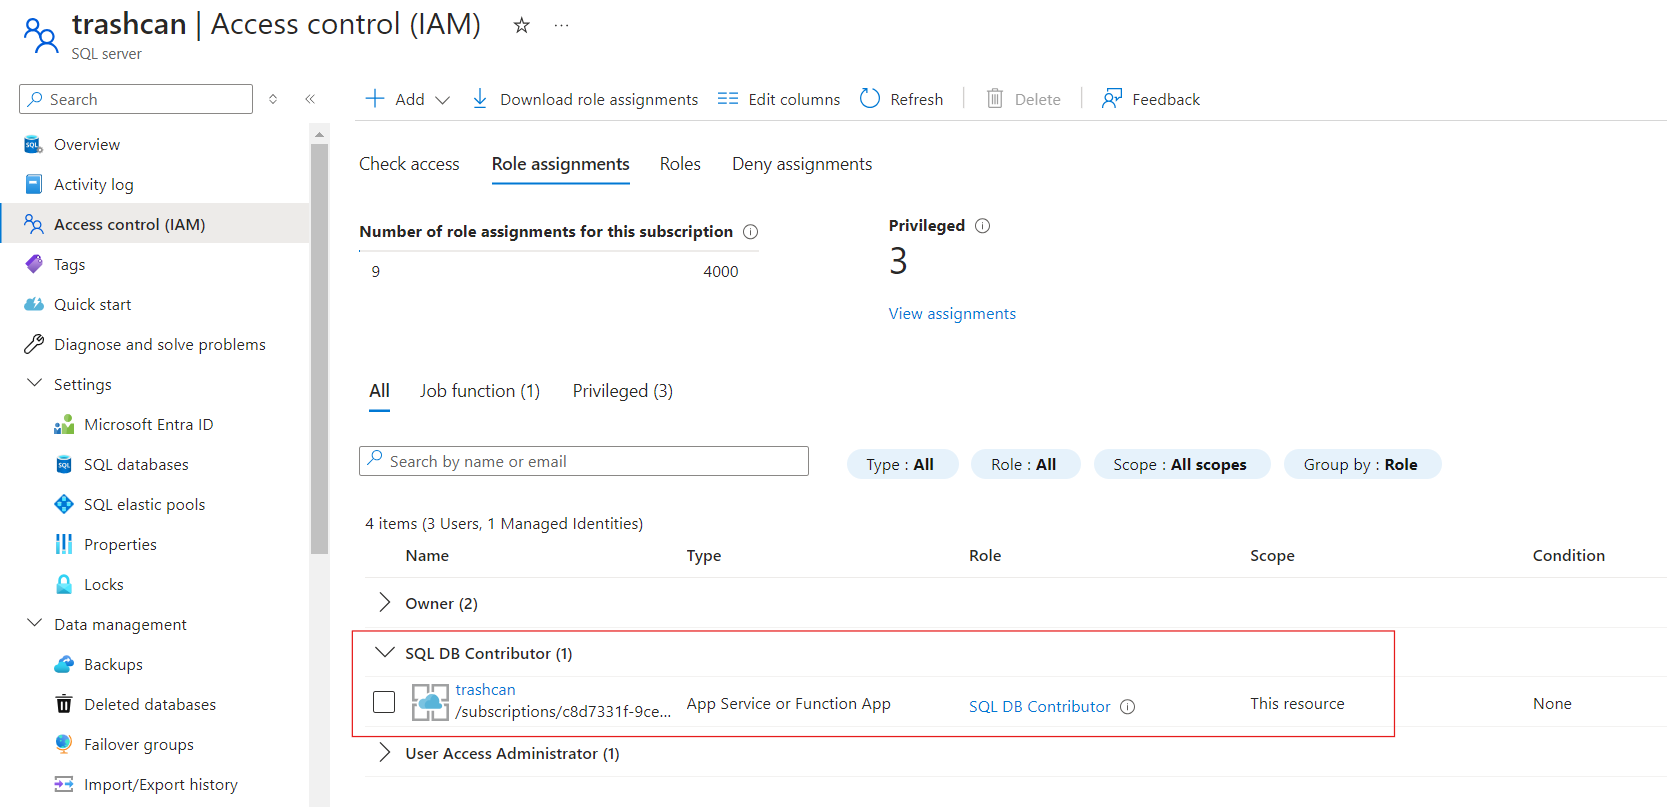
We need to grant our App Service's managed identity permission to access the SQL server.
Also, make sure that the server allows connection from your app service's integrated vnet.

I have found Azure Data Studio to be the easiest way to work with Azure SQL Server. You can find installation instructions here. After installation, create a new connection.
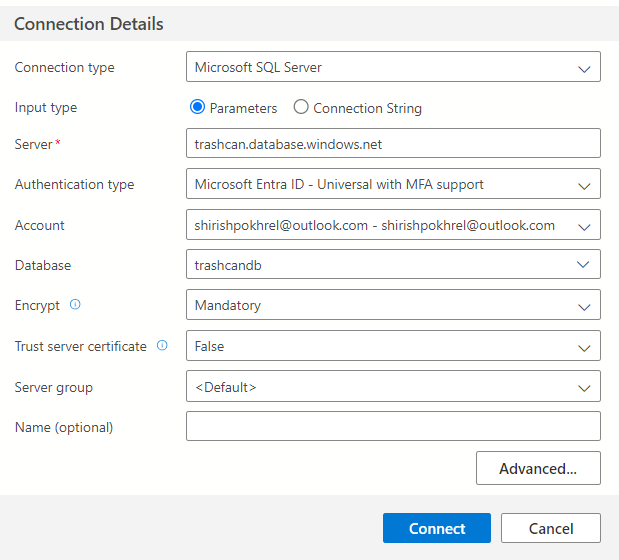
You may need to login to your Azure account to authenticate. After you have established a connection, you can create a new table in the database.
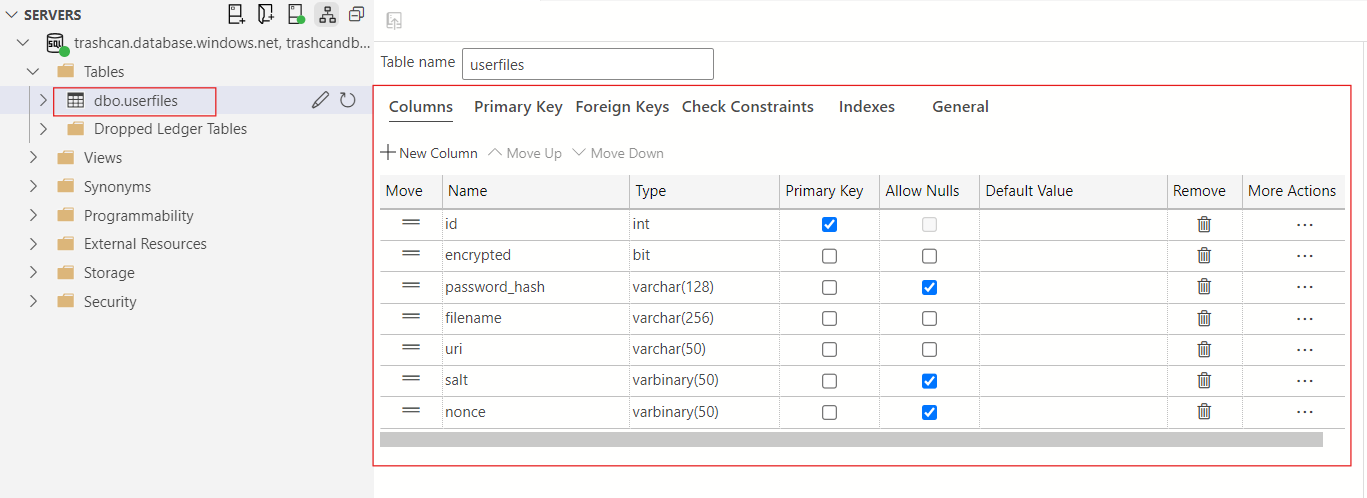
I have the id column setup as identity which auto-generates the id for any row we insert.
Connect to the Databse from the App
We will be using the Flask extension for SQLAlchemy to interact with the database, install it with pip install flask_sqlalchemy. The process of establishing a connection using Entra ID auth is a little complicated and it took me some frustrating hours to figure it out. You need to use an authentication token which you can get with DefaultAzureCredential(). The advantage is that it works with any authentication method whether it's a managed identity, CLI, PowerShell, or anything else. You can read more about connecting to Azure SQL with the pyodbc driver (which is what SQLAlchemy uses) here. Authenticating with SQL credentials could be simpler but it's an older method and not recommended anymore.
SQL_COPT_SS_ACCESS_TOKEN = 1256
TOKEN_URL = "https://database.windows.net/"

connection_string = os.getenv('AZURE_SQL_CONNECTIONSTRING')
connection_url = URL.create("mssql+pyodbc", query={"odbc_connect": connection_string})
token_bytes = default_credential.get_token(TOKEN_URL).token.encode('utf-16-le')
token_struct = struct.pack(f'<I{len(token_bytes)}s', len(token_bytes), token_bytes)
app.config['SQLALCHEMY_DATABASE_URI'] = connection_url
app.config['SQLALCHEMY_ENGINE_OPTIONS'] = {"connect_args": {"attrs_before": {SQL_COPT_SS_ACCESS_TOKEN: token_struct}}}
model.db.init_app(app)
Your AZURE_SQL_CONNECTIONSTRING environment variable should look something like this:
Driver={ODBC Driver 18 for SQL Server};Server=tcp:trashcan.database.windows.net,1433;Database=trashcandb;TrustServerCertificate=no;Connection Timeout=30;
This is not a Python tutorial so I won't go into any detail about inserting and query data into and from the datbase. You can always check out the full source code on github. I also implemented the encryption feature and made the frontend more tolerable with CSS and Jinja2 templates.